
WIN Learning Career Readiness System Release Updates: October 2026
Version 6.12.0 Released 10/15/2026
Summary
Version 6.12.0 of WIN Career Readiness System code was released to production on October 15, 2026. Highlights of the release include:
- Assessment Accommodations and Language Updates
- Class Roster Import
- Assessment Status Report
- Monitor Assessments Update
- Password Reset Code
Assessment Accommodations and Language Configuration
Assessment Accommodation configuration has moved from inside the User Profile. Assessment Language configuration has moved from the Assessment Assignment grid. Both are now accessible from User Administration (for single configuration) and Class Management (for single or bulk configuration).
In User Administration, staff with permissions to configure accommodations and language will:
- Go to User Administration
- Search for the learner
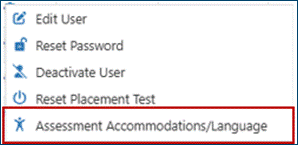
- Click the action gear
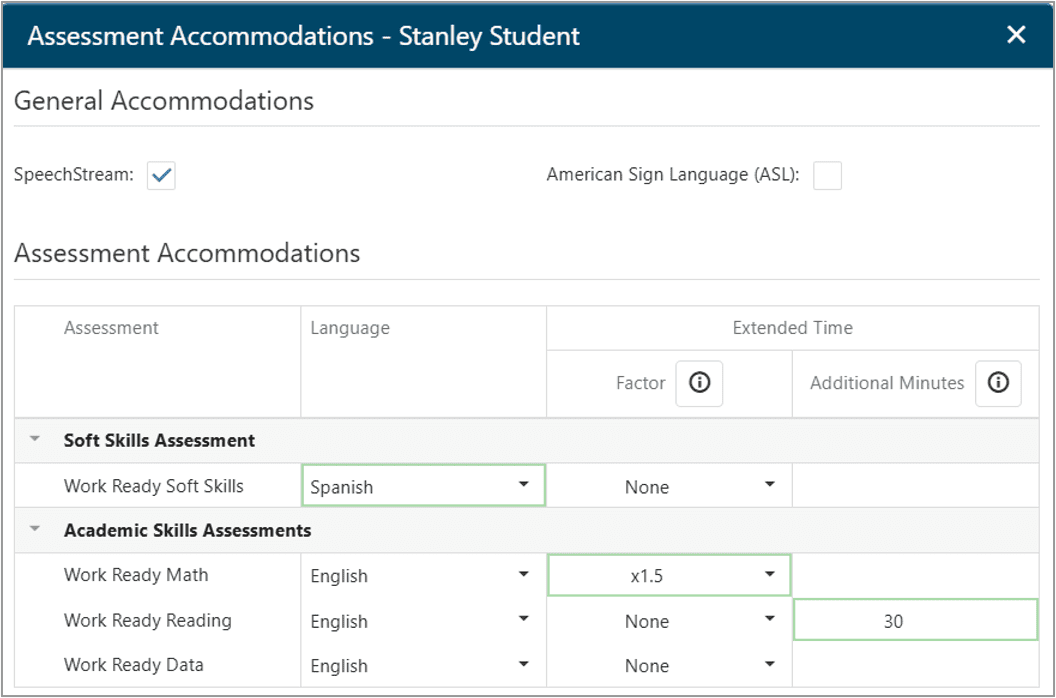
- Select Assessment Accommodations/Language
- Set accommodations and/or language
- Click Save
Staff without permissions will retain Read Only access.
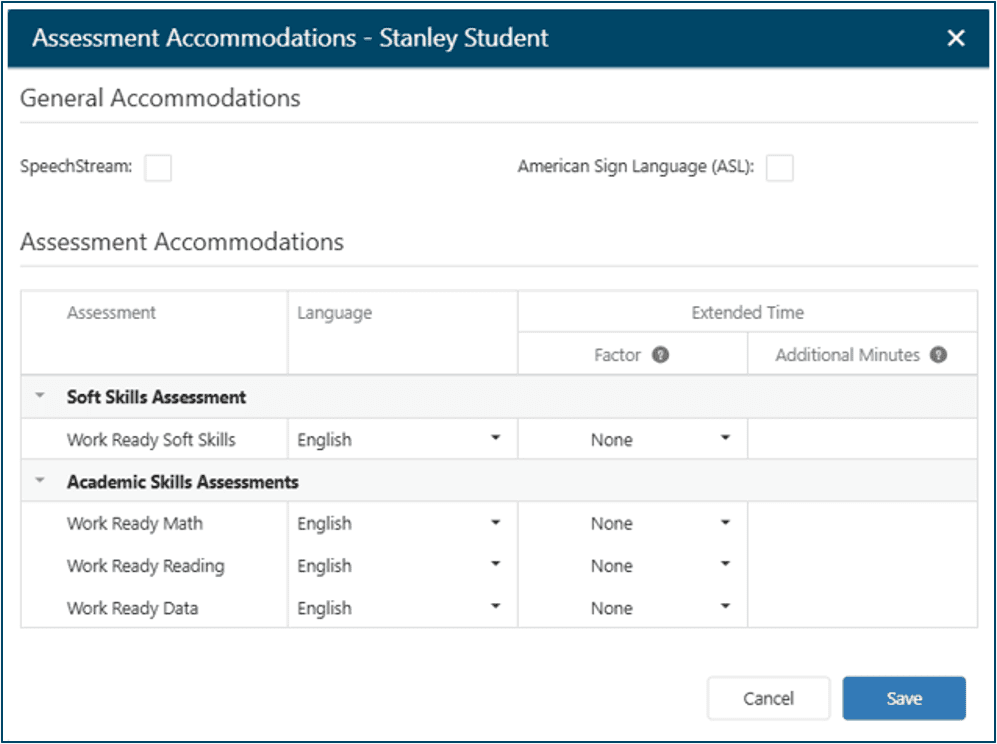
*If your organization does not offer alternate language assessments, the Language options will not be visible in the configuration box.
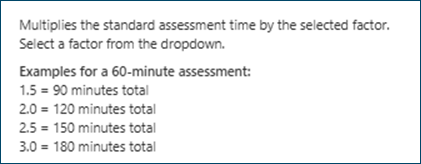
Extended Time Factor Info:
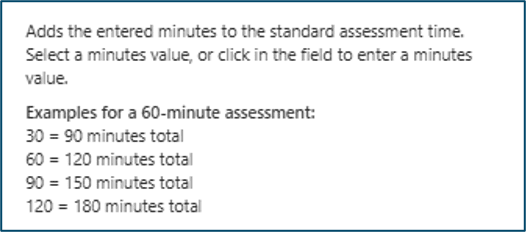
Extended Time Additional Minutes Info:
In the following example, SpeechStream is selected, and some Language and Extended Time values are selected.
In Class Management, staff with permissions to configure accommodations and language will:
- Go to Class Management
- Select the desired class
- Select one or more learners from the class roster
- Select the bulk action icon for Accommodations at the top of the grid

- Set accommodations and/or language
- Click Save
Staff without permissions will retain Read Only access.
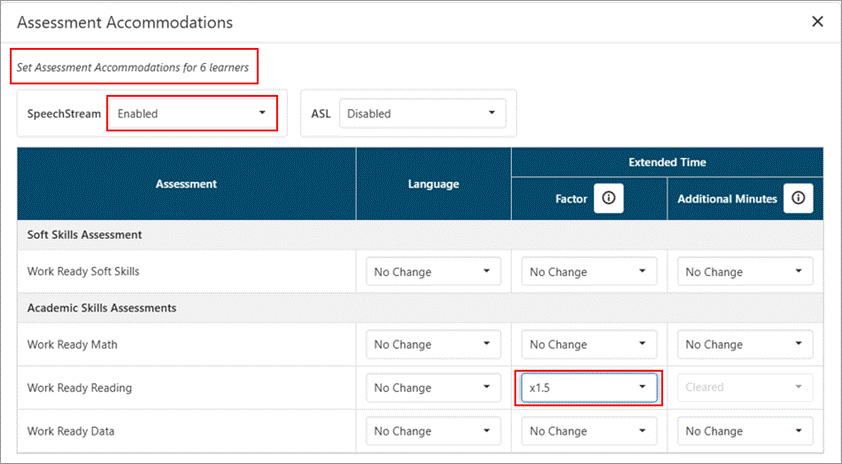
When making bulk changes, the selections will default to No Change. Changing a setting will change it for everyone in the selected group.
In the following example, SpeechStream has been enabled and Work Ready Reading has been set to extended time by a factor of x1.5 for 6 selected learners.
Class Roster Import
Teachers and Administrators can now import class rosters and have them automatically created in WIN Career Readiness System. Multiple class rosters can be created for an organization with just one file upload. This process creates new classes. It does not add users to existing classes.
Prerequisite:
Learners and Facilitators in the rosters must have active enrollments in WIN Career Readiness System.
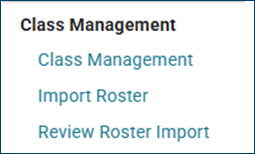
Users with permission will go to Admin - Class Management - Import Roster
Select Roster Import Instructions to access detailed instructions on the Import and Review process.
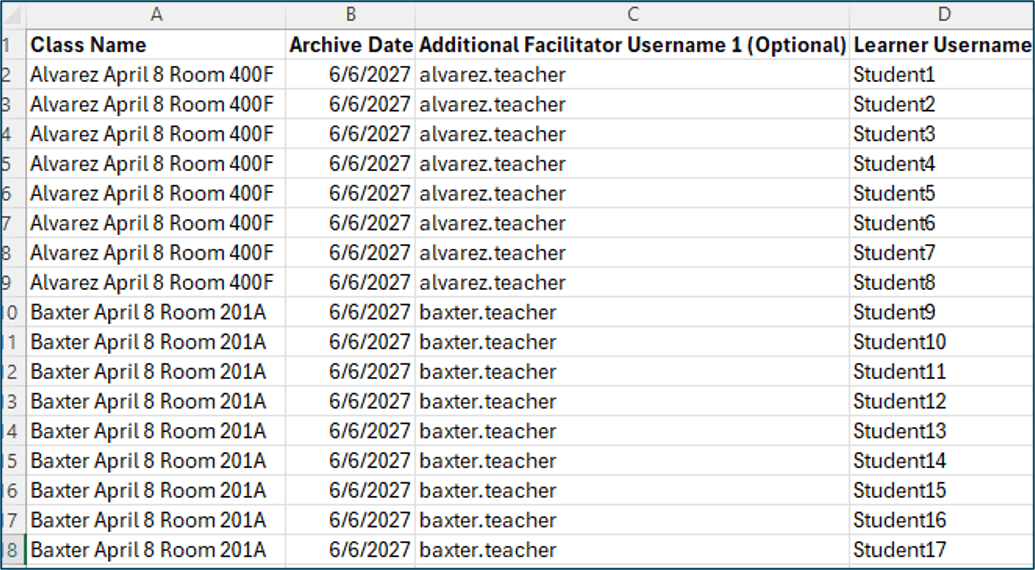
Either Download Template or use an existing file. Make sure your file has the required information and is configured correctly. The file must be a .csv file format.
Required fieldsinclude: Class Name, and either Learner Username, WINCRS ID or Unique ID.
Optional fields: Facilitator(s) Username, Archive Date, Reset Date
You do not need to add yourself as a facilitator, but if you want to add additional facilitators you will need to include their username(s) in the Facilitator column. You can pull Learner Usernames, WINCRSID, or Unique ID from User Administration if you don’t have them elsewhere.
Click Field Definitions for more details about requirements. Your file can have extra information that helps you organize the information; it will not interfere with the import. For example, you can include learners’ first and last names.
Sample File
Click Select File to upload your roster file, or drag and drop your file to the designated area on the screen. Then click Upload File.
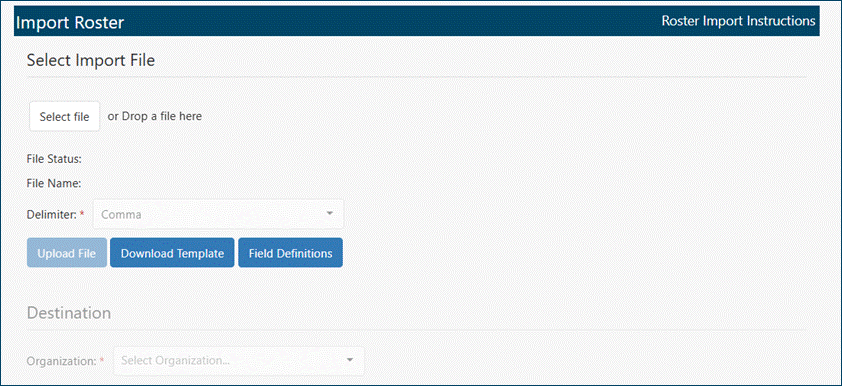
Once your file is uploaded, select the organization where the roster will be created. Rosters can be created at the school / location level. If you only have access to one organization, it will be pre-selected.
Next, you will map fields to help the system know which column names in your file match which application field names. You do not need to map columns with extra data (e.g. Student name, date of birth).

Select Submit for Validation. The system will now validate all of the data in the file to make sure it can create the classes.
You will automatically be directed to the Review Roster Import screen. If you have to leave and come back, to complete the process you will go to Admin - Review Roster Import and select the file for the roster you want to complete.
At the top of the screen is information about the file. If the wrong file name is displayed, click Select File and choose the correct file.
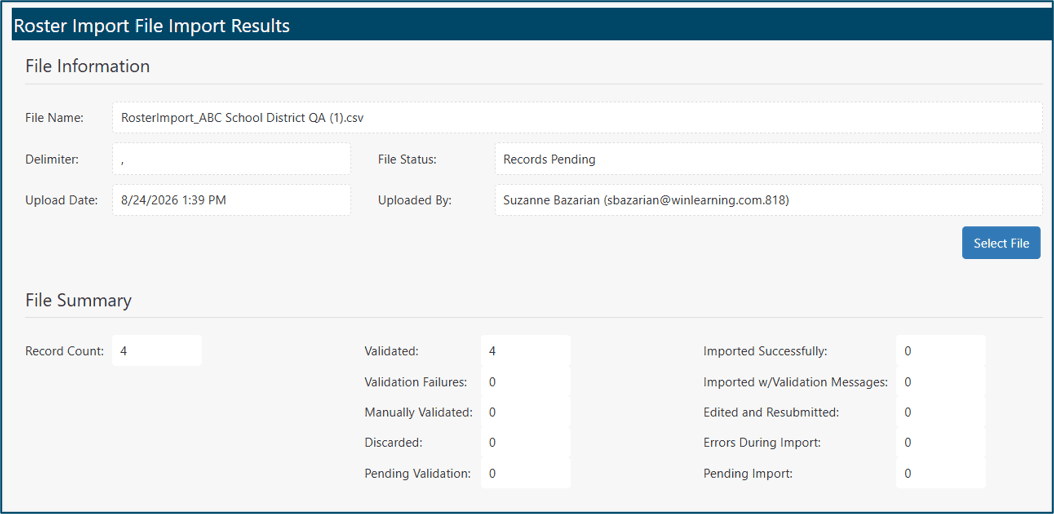
Scroll down to the bottom half of the screen, which is where you will see if there are any validation issues.
If there are any errors, there will be a warning icon on affected tab(s) 
This indicates areas that require your attention before completing the upload.
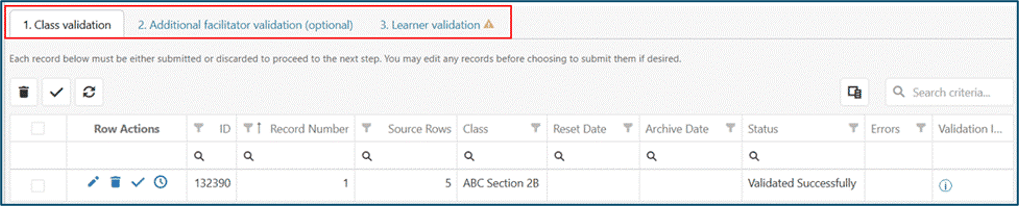
There are three tabs and the process will validate the data in each.
- Class Validation will display if there were any errors creating the class. For example, if the class name already exists, you will see that error and need to correct it.
- Facilitator Validation will display if there were any errors finding or associating the assigned facilitators to the class.
- Learner Validation will display if there were any errors finding or associating the assigned learners to the class.
Each record on each tab must be either submitted or discarded to proceed to the next step. This allows you the flexibility of making any changes before finalizing the roster upload. You may edit any records before submitting them by clicking the pencil and making edits.
To submit, select the record(s) and click the checkmark (Submit Record) either in the row, or at the top of the grid for bulk submission.
To discard, select the record(s) and then click the trash can either in the row, or at the top of the grid for bulk deletion.
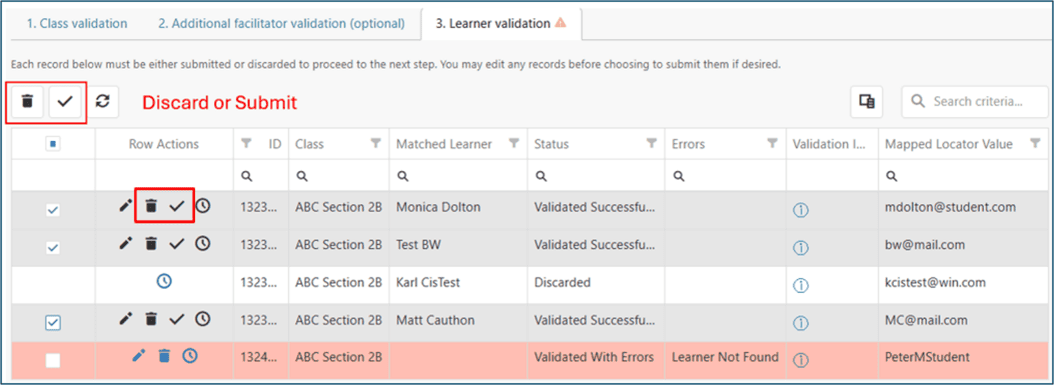
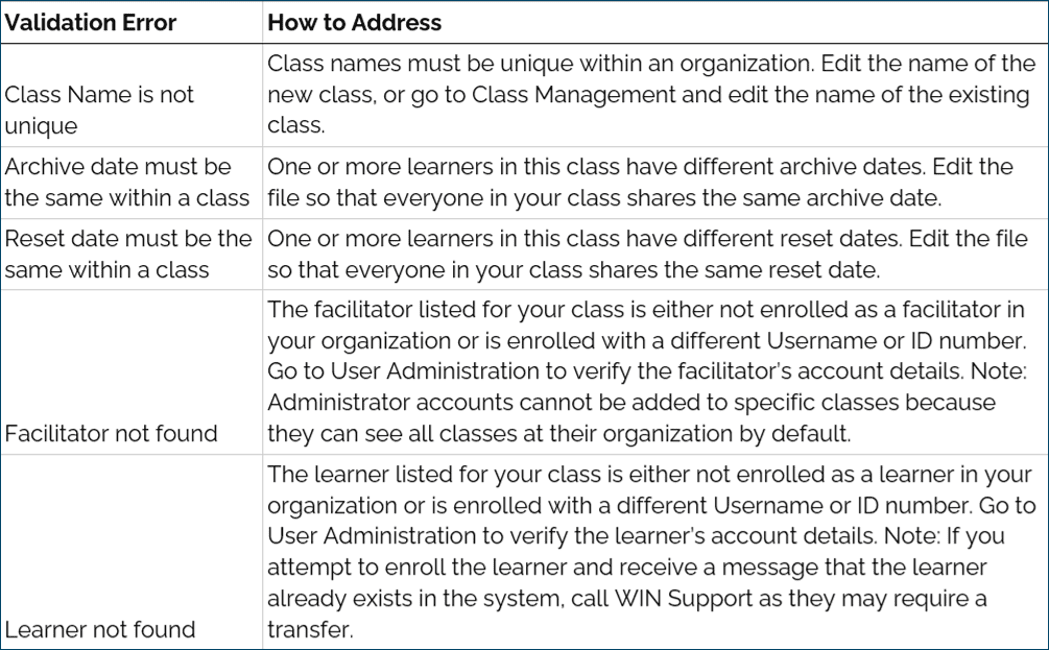
Some common validation errors include:
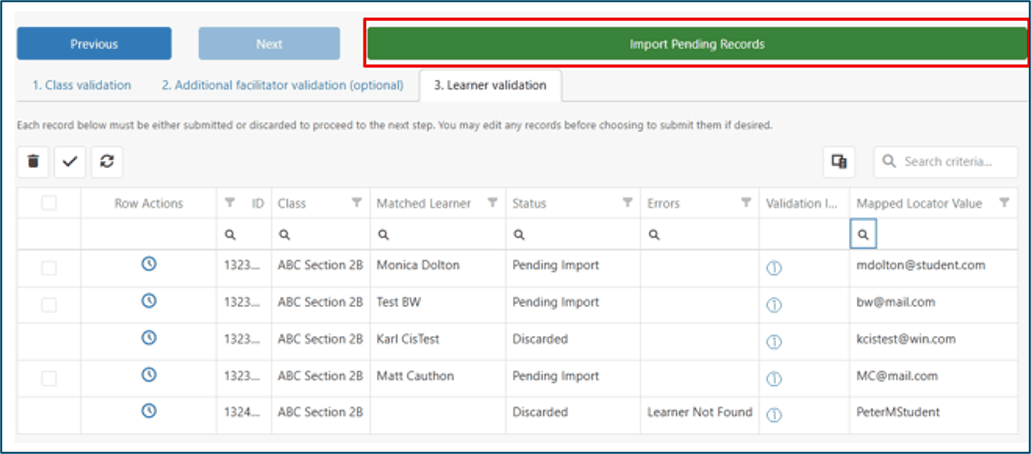
Once all validations are complete and passed, click Import Pending Records.
Review the confirmation screen and if accurate, click Continue.
The class roster has been created and can be accessed and managed through Class Management.
Assessment Status Report
A new report is available that allows administrators to see the assessment status of active students within a test window. This will help administrators determine if there are students in their organization who have not yet completed testing.
Prerequisite: Must be a client with an established test window
Administrators will go to Reports - Assessment Status Report.
There are two Views: Assessment Details and Learner Summary. Select the View you’d like.
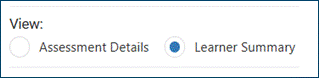
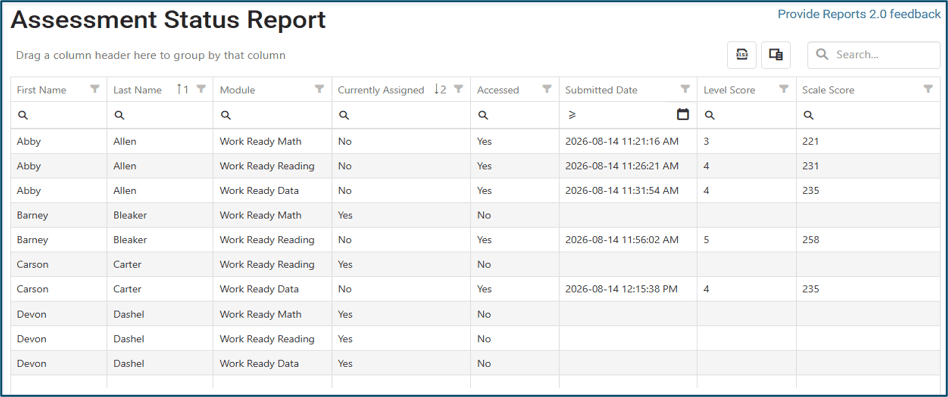
Assessment Details: Displays the assessment status data as one row per assessment per learner. A learner may have multiple rows.

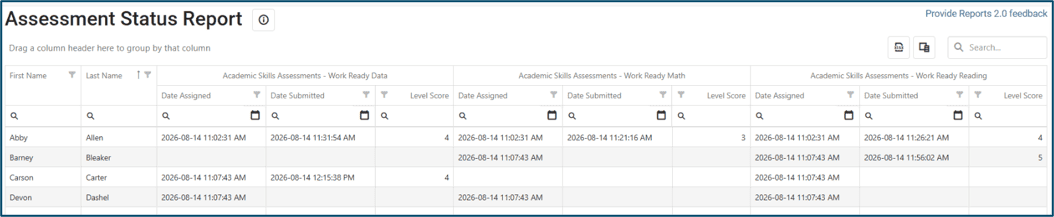
Learner Summary: Displays the assessment status data with one learner per row and each assessment grouped across columns.

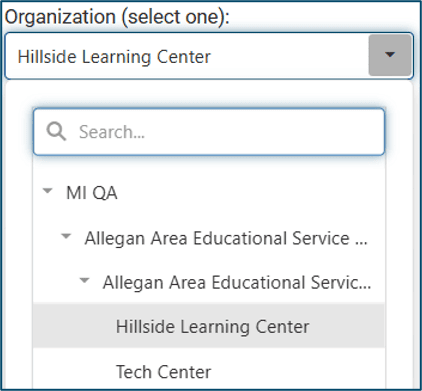
Then select your organization from the dropdown.
Product Offering(s) will default to selected for all products available to your organization. You may adjust the selection in the Product Offering(s) filter.
The Assignment Date filter will default to the assessment assignment window date range. Adjust the dates as desired..
Select Run Report.
Users may also search for an individual student by name, email, username or ID.
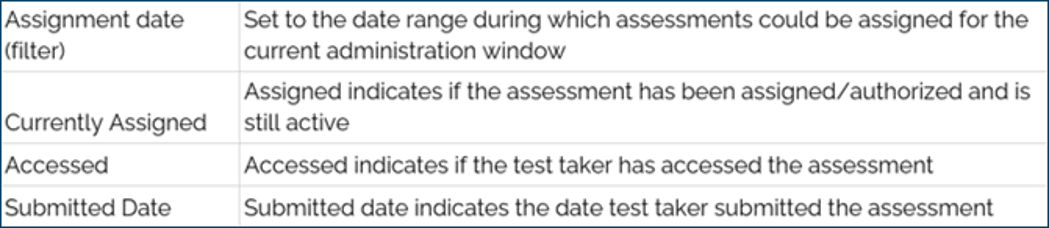
The results will display all active students in the organization. It will display if the assessment is Currently Assigned, has been Accessed, and/or has been Submitted for each student. It will also display Level Score and Scale Score of the assessment(s) if submitted. Each of the columns can be filtered.
Assessment Details View
Learner Summary View
Field Definitions
Report Configurability
Selecting the Column Chooser at the top right of the grid will allow the administrator to hide or show individual fields from the grid.
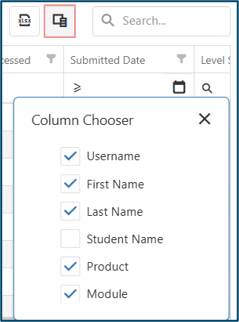
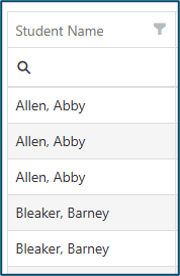
In addition, if displaying the students’ full name in a single column is desirable, the administrator can select Student Name from the column chooser and hide the separate First Name and Last Name fields.
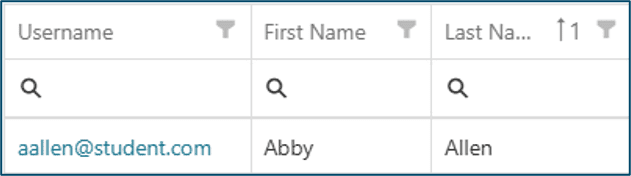
If Username is displayed, the administrator will be able to click the username to be directed to the student’s Individual Activity Report for more detailed information.
Lastly, the report is exportable to Excel by selecting the xlsx button at the top of the grid. 
See the WIN Career Readiness System Reports Manual for more details.
The Monitor Assessments page now has a paginated monitoring grid which allows proctors to monitor more than 30 students at a time. The pagination buttons appear at the bottom of the grid.
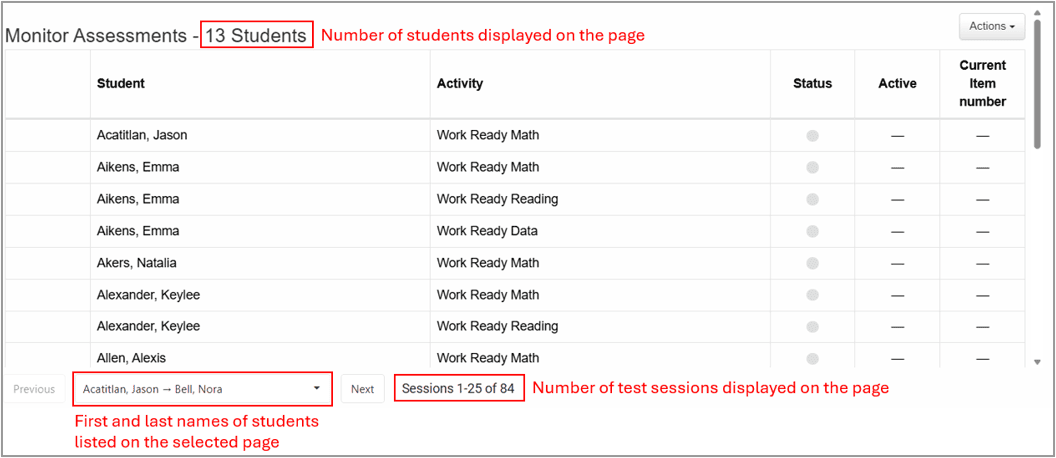
Previous brings the user to the previous page of students. Next brings the user to the next page of students. In between is a dropdown that shows the names of the first and last students on the selected page to make it easier for the user to identify and select the desired page.
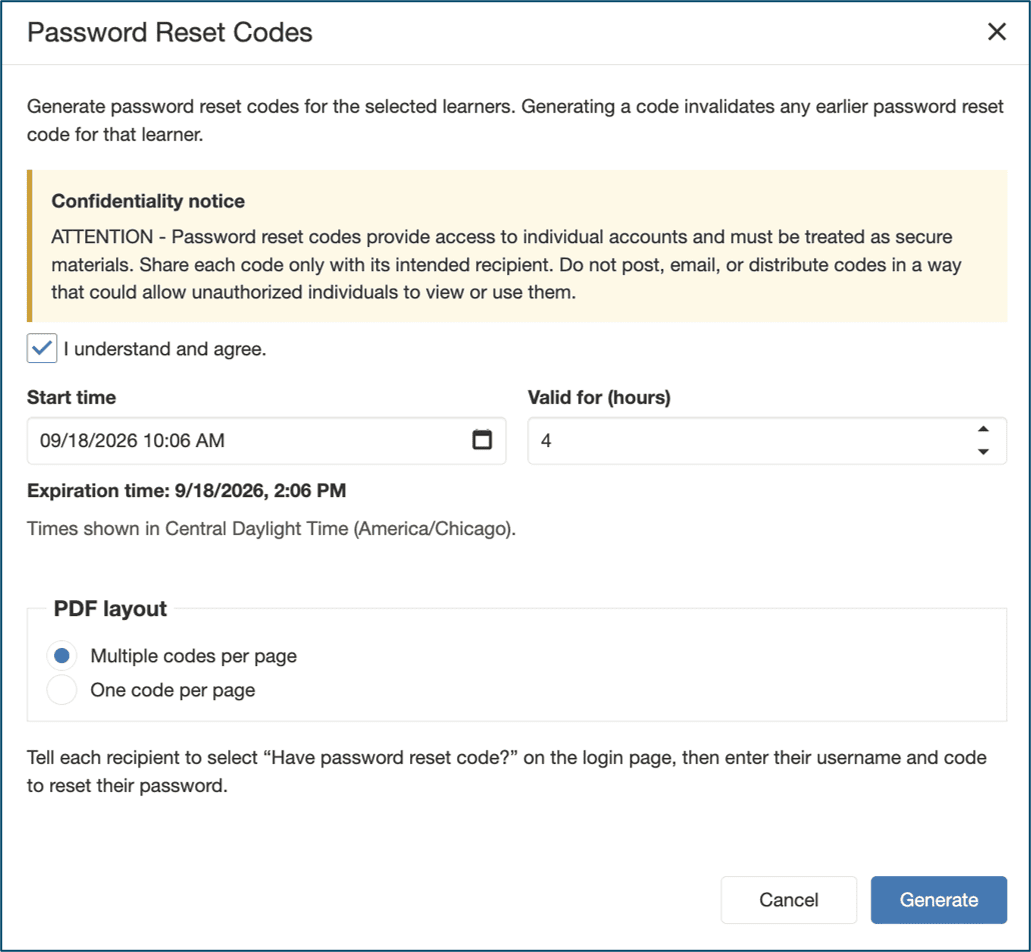
The ability to view learner passwords has been completely removed from the system in both Class Management and User Administration. Facilitators who need to share login information with their students now have the ability to generate temporary password codes. This will allow learners to login where they will be prompted to change their password. Password Reset Codes can be generated from Class Management and User Administration.
Key Features
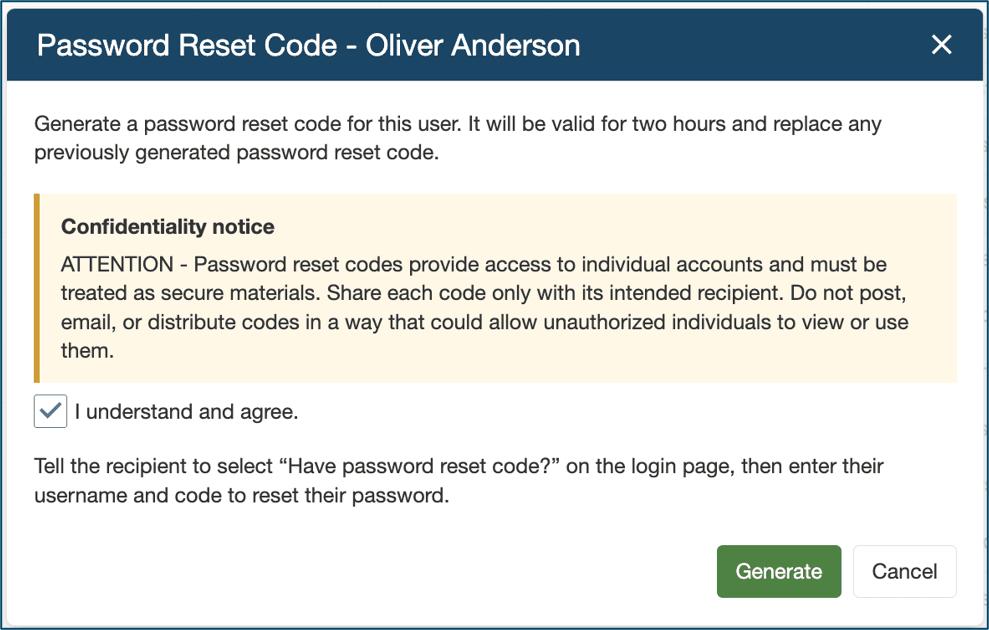
- In Class Management, facilitators will be able to designate the time period during which the codes will be valid, so they can generate and print the codes ahead of class and have them only be valid during class. Codes generated in User Administration are valid for 2 hours.
- Codes can be generated one per PDF sheet or multiple per sheet.
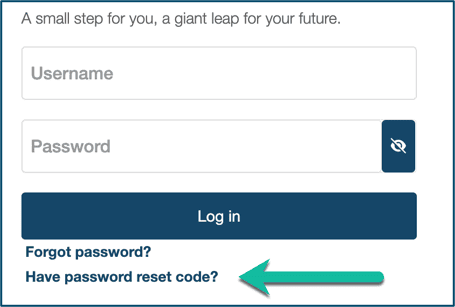
- Students will select “Have password reset code?” on the Login page where they will be prompted to enter their username and code.
Class Management
Select your class. Select Password Reset Code at the top of the grid. Generate codes for all students or selected students.
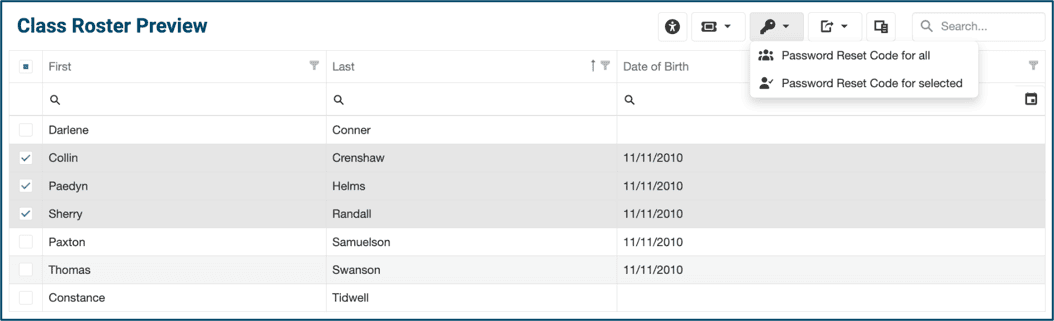
NOTE: Clients using test tickets within an active test administration window will not see the Password Reset Code option in Class Management until after the test administration window is closed.
User Administration
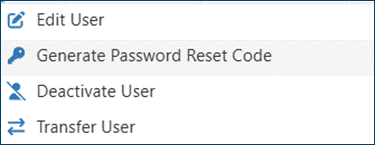
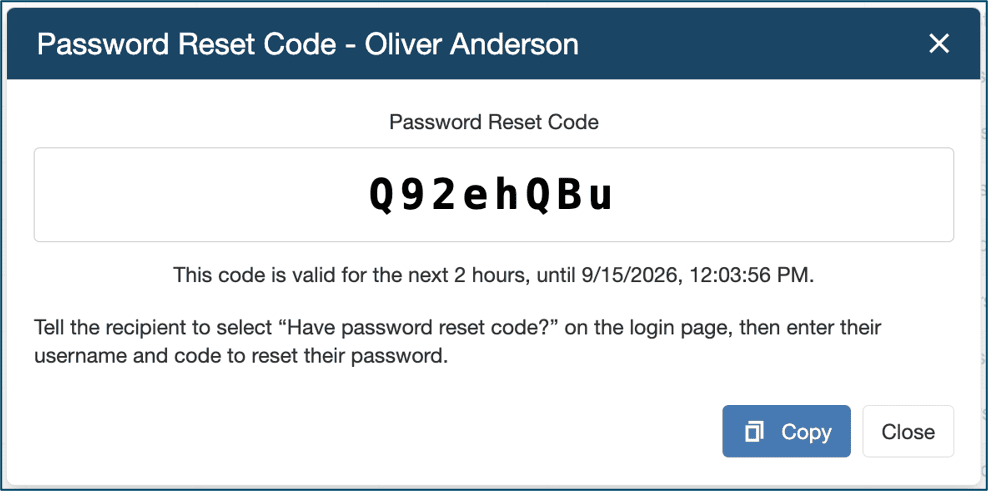
Generate your list of students. Select the gear next to the student’s name and select Generate Password Reset Code.
Password Reset Code Login
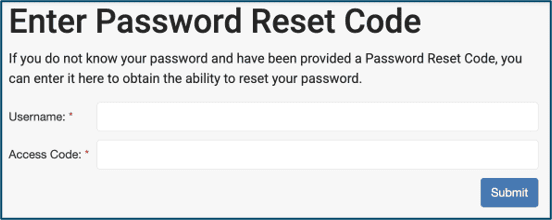
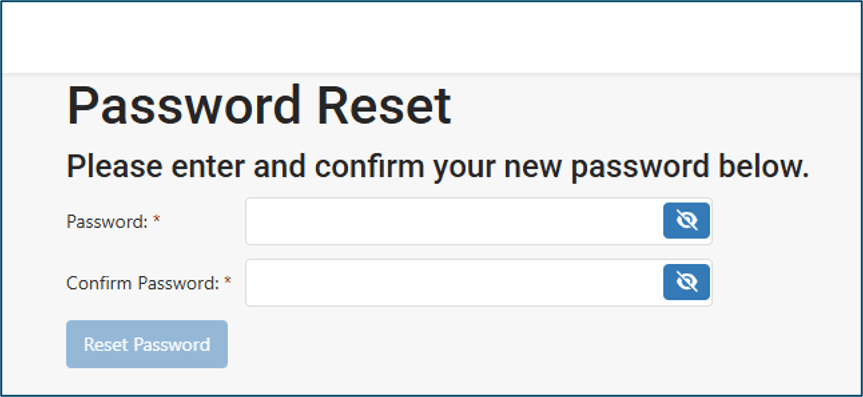
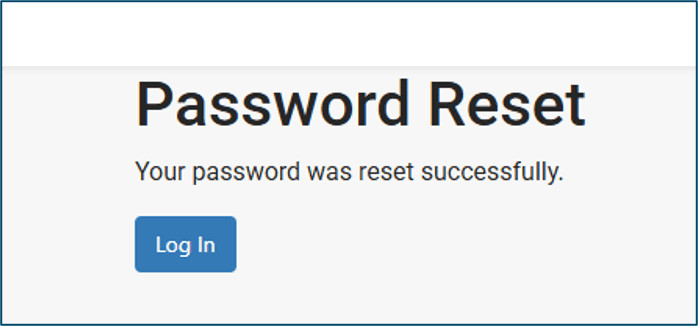
Students with a Password Reset Code will select “Have password reset code?” under the login fields on the login page. They will enter their username and code and click Submit. They will then be prompted to create a new password.
Miscellaneous
New custom field data type: phone number

Manage Organizations and Class Management have been separated into distinct categories in the Admin dropdown.
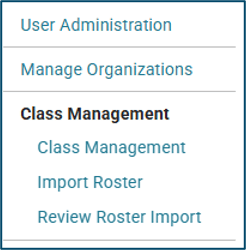
Manage Organizations brings users with permission to the list of organizations they have permission to see and manage.
Class Management brings users with permission to either Class Management where they can build and manage classes, or to Import Roster / Review Roster Import where they can import class rosters to the system.
Users who login with an out of compliance password, will be prompted to change their password.

Added a product filter to the Learner Credential Summary Report so users can select the desired product before running the report.
Coming Soon
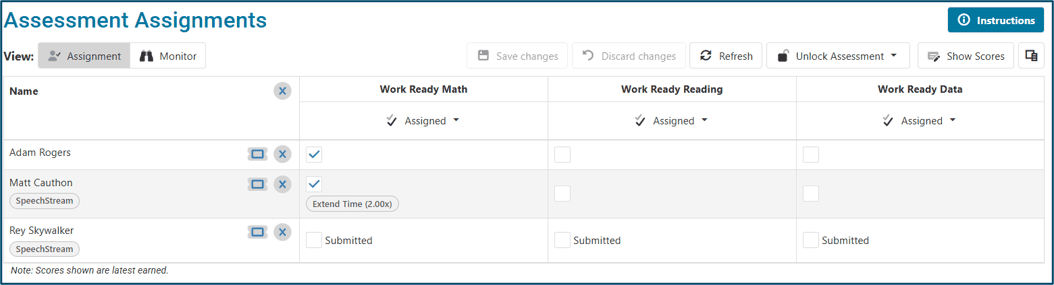
In January, a new Assessment Assignment workflow will be introduced with an improved interface and additional security features.
What to expect:
- An updated grid with clearer labels and information
- The ability to select individuals or groups of students to monitor
- The ability to assign assessments in advance and unlock on test day with a code
- The ability to hide scores in the grid while still indicated Submitted
For more information or support, contact Support at WIN Learning
To report issues or ask questions about this release, please contact the WIN Learning Help Desk:
Email: support@winlearning.com
Phone: 888-717-9461 Option 3
All internal and external support requests are logged and tracked and get routed to the appropriate parties.
Please remember to include a detailed description of the issue, who it impacts, system/environment info, and reproduction steps and an actual due date. If helpful, please include a screenshot.
